Firstly, things were going to cover in this and future tutorials are going to range from Shading and colour balancing, effects such as heat blur, motion blur, rain, condensation and Finishing techniques such as borders and final resizing and sharpening.
Im not going to go into detail about actually taking your screenshot, there are articles in the tech section on Antialiasing and filtering modes, your screenshot needs to be crisp and free of jaggy lines and other unrealistic items such as text bars and 2D panels. Your SS is only going to be as good as what your working with.
Ok, Before we begin...Some of the stuff I cover in this first Tutorial are very basic, and i have made it so that people who have never done this before can identify the tools i am talking about, If you understand them good for you but i though it nessecary to point them out just incase

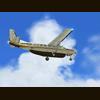
Our first tutorial is going to cover the lighting balancing of this screenshot. As you can see it way too dark, and it needs some brightening and cropping, its never good to have too much 'nothing' going on around your shot.

You will need to locate the curves adjustment. This controls the total highs and lows in the picture itself. The line will be void of any points when you first open it, you need to click in the line to 'add' a node. Then i have adjusted the line into a curvature, this tells it to add more white into the darker regions. don't confuse this option with the brightnes and contrast option ( its similar, but you have no control over the tone range that it affects) Try it and see if you can replicate the curve adjustment, you will find it near impossibe

Next Were going to 'crop' the unwanted excess area around the picture to focus the attention on the aircraft. the crop tool is self explanitory, I use this to also cut the zoom red message.

Now seems a good time to explain layers to you all. Photoshop enables users to add layers above the original image we use these to our advantage for filtering effects adding shading, masking areas etc without having to alter the original image, if you make a mistake you can simply just delete the layer and start over. this is a very breif overview of what you can do with layers, theres so much to cover you will pick things up as we go along.

So here were going to create a new layer for our borders.
Use the rectangle marquee to create a border shape at the top of the page, make sure its on the new 'layer2' use the bucket tool to fill the marquee with black, thats it! If you drag the 'Layer2' down to the create new layer icon that you used you will notice that it duplicates what you have just done into a new layer (This is an invaluble asset in photoshop) Finally use the arrow tool to drag your now 'Layer2copy' to the bottom of the page to complete the top and bottom borders. when in place use the menu select > deselect to get rid of the marquee.


At this point the ss is pretty much ready, you can go ahread and save your work as a PSD file now incase you want to change it later. we are now going to flatten the image copy it to a new document and sharpen it before saving it as a jpeg ready for the forum.
CTRl + SHFT + E will flatten the entire layer format into a flat image, if like me you run a high resolution thats far too big for a forum SS your going to need to resize it. once flattened drag the marquee over the entire SS so its all selected and copy it CTRL+ C, ..as you probably know
 then go to file > new, and in the presets in going to use the 1024 width by 768.
And paste it in.
now, CTRL + T activates the transform mode, hold down shift when transforming objects as it keeps everything in proportion this enables us to scale the image, and anything else in ps for that matter on a layer. We need to scale it down untill it fits our page and use the crop tool again to get rid of the white excess above and below. your ss should now look be resized to a more acceptable size and make forum users happy as they don't need to load your 1600 x 1050 gigantic SS


And lastly! were nearly there! Go to Filter > sharpen > sharpen. What this has done is preserve the details that were lost when we scaled the image down, i frequently see people whining about not wanting to crop their SS's becasue they want to preserve the 'detail'. If you do it like this there will be no visible degredation of the shot itself

now its time to save it as a BMP or JPEG, I always use JPEG, and i get it close as possible to the 250kb limit we have here it will guesstimate in the save bar what the file size will be, try and get it around 222kb mark.

And there it is, simple colour correction, a nice border and sharpening to tie it off and a forum friendly size.
Thanks for reading i really hope you learn something from this tutorial and get practicing, soon you should be able to pull this whole process off in no more than a coulple of minutes per shot

The next tutorial is going to cover the 'illusive jet blast' and the most effective way of creaing the best possible result in your shots.
Cheers Dan.