Jump to content


- - - - -

~Screenshot Editing Tutorial~


  • Please log in to reply
25 replies to this topic

#1 TomohawK

TomohawK

    Airline Transport Pilot

  • Contest Host
  • PipPipPipPipPipPip
  • 2,682 posts

Posted 14 January 2006 - 01:16 PM

Hey guys, welcome to Part 1 of my basic editng tutorial. In this part i will mainly look at   colour changing and some other tools but not so much the filters, in part 2 i will look more at using them in greater detail  :lol:.
Before we start you will want to make sure you know how to capture and save a screenshot in flight sim. If you don't know how to CLICK HERE.
Another thing is that i am using Adobe Photoshop CS2 to edit, all other photoshop users will know where to locate named tools ETC but i will give instructions anyway  :censored:. If you don't have Photoshop, i suggest downloading a FREEWARE program called THE GIMP.

Also, this is my way of editing and what i do is how i wish to do it, i know im no where near the best at editing but i created this to try and help others who share a passion for aviation, so please don't critisize me if i appear to be doing something wrong :D

Start

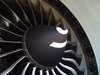
For this tutorial ill be using this image, you use it aswell for the first time  :lol:

Posted Image


Fisrt thing, open up your image in your editing program.

Posted Image
(at this point i want to say sorry for the terrible image quality)

At this point you image will be very large so we want to resize, try 800x600 pixels. To do this go, Image => Image size and enter 800 for the width and 600 for the height, making sure they are in pixels.
After this process is complete you may notice the image looks a bit soft, what I tend to do next is sharpen the edges, to do this i use a sharpen filter. Filter=> Sharpen=> Sharpen Edges. This will crispen up the image.
Posted Image

Now we want to really start editing. Before i go about changing the colours, levels and contrast i would usually do any jobs that have to be done with filters but we don't need to in this Tutorial.
A great tool which i use is Auto Colour, this will usually enhance the images colours but can sometimes spoil it if used on a night shot. So here im going to give you 3 things to do.
1. Auto Colour; Image=> Adjustments=> Auto Colour
2. Auto Levels; Image=> Adjustments=> Auto Levels
3. Colour Balance; Image=> Adjustments=> Colour Balance, and add red, usually use around +20 - +30.

Posted Image

Now your shot should look noticably different from what it was when you started. The next thing that i would advise is playing around with the shadows and highlights. Thsi is what i do.

1. I reduce Shadows to 0
2. I increase highlights to between 10 and 20.

Try it and see if you like the look of it.
Image=> Adjustments=> Shadow/Highlight...

Next i will normally add photo filter. To do this go;
Image=> Adjustments=> Photo Filter...
Select Warming Filter (85) and set the density to around 15%.

Were getting there :lol:

Now, go back to  Image=> Adjustments and select Brightness/Contrast...
don't touch the brightness slider but adjust the contrast to +*, i normally go around 10 but it depends on the shot, you decide.
Now the shot looks a bit like this
Posted Image

Only 2 things left to do!

In your pallet, select the two colours to a bright white
Posted Image

And now go to Filter=> Distort=> Diffuse Glow...
Use the following settings or there abouts  :lol:
Posted Image

And finally, select the blur tool from the box at the left hand side
Posted Image

Use the settings shown inside the blue ring.
Then zoom right up close to the plane and blur the edges of the plane to hide any jaggies, do it for the whole aircraft.

Now you are done! And should have an image like this...
Posted Image

-----

I hope you liked this small Tutorial and that it is to your benefit, please post your final outcome as it will be interesting to see what you guys can do, or need more help with  :D
Part 2 will show more use of filters and will be up as soon as i can, possibly next weekend
:censored:
Enjoy and have Fun!

Tom. :)

Edited by TomohawK, 14 January 2006 - 01:35 PM.


#2 Speedbird_one

Speedbird_one

    formerly 01hthochr

  • Members
  • PipPipPipPipPipPip
  • 3,567 posts
  • Location:Near Sheffield

Posted 14 January 2006 - 05:11 PM

Thanks tom that has at least gave me a start i so desperatley needed

thanks for taking the time :D

#3 Gunny

Gunny

    Private Pilot - VFR

  • Banned
  • PipPipPip
  • 123 posts

Posted 14 January 2006 - 09:22 PM

you gave me inspiration I am goping to do a tutorial

#4 767-300ER

767-300ER

    Commercial Pilot

  • Members
  • PipPipPipPipPip
  • 1,915 posts
  • Location:Scotland, UK

Posted 15 January 2006 - 07:21 AM

Great work Tom. My shots look so much better now.  :D  :)  :D

#5 TND4NOS

TND4NOS

    Official Contest Host\Edited Contest Host

  • Contest Host
  • PipPipPipPipPipPipPipPip
  • 10,918 posts
  • Location:Western Australia

Posted 15 January 2006 - 07:50 AM

Another tip that i use on everyone of my shots.... :)

Copy the picture as a new layer then blur the entire picture and use the erasor tool to erase out the blur (using a high but not 100% opacity on the aircraft or what ever you are focusing on then as you get closer to the edges of the aircraft, start lowering the opacity of the erasor so you get smooth edges, not sharp and cant pick between the blur and the un-blurred :lol:
The area you erased should be the bottom clean editing picture that you first copied to create the blurred layer :lol: then all you need to do is merge back to the flattend pic :lol:

Arron!! what are you doing?? releasing tips :D... :D


Cheers, Arron

Edited by TND4NOS, 15 January 2006 - 07:51 AM.


#6 Speedbird_one

Speedbird_one

    formerly 01hthochr

  • Members
  • PipPipPipPipPipPip
  • 3,567 posts
  • Location:Near Sheffield

Posted 15 January 2006 - 09:28 AM

Here's my atempt using both tips :D
Posted Image

Tips/ comments more than welcome

Edited by 01hthochr, 15 January 2006 - 09:30 AM.


#7 TomohawK

TomohawK

    Airline Transport Pilot

  • Contest Host
  • PipPipPipPipPipPip
  • 2,682 posts

Posted 15 January 2006 - 09:34 AM

01hthochr, on Jan 15 2006, 02:28 PM, said:

Here's my atempt using both tips :D
Posted Image

Tips/ comments more than welcome
Looks fantastic Chris! Well done  :D

#8 TND4NOS

TND4NOS

    Official Contest Host\Edited Contest Host

  • Contest Host
  • PipPipPipPipPipPipPipPip
  • 10,918 posts
  • Location:Western Australia

Posted 15 January 2006 - 09:44 AM

Nice, but your opacity around the aircraft was too high... aim to have the high points around the main center of the aircraft and don't blurr the background out so much.

This shows how it should look:
Posted Image

See how the background is blurred slightly but the aicraft isnt... this draws the aircraft out nicely and clear also this hides some jaggys when performed properly.

Edited by TND4NOS, 15 January 2006 - 09:49 AM.


#9 Speedbird_one

Speedbird_one

    formerly 01hthochr

  • Members
  • PipPipPipPipPipPip
  • 3,567 posts
  • Location:Near Sheffield

Posted 15 January 2006 - 10:12 AM

TND4NOS, on Jan 15 2006, 03:44 PM, said:

Nice, but your opacity around the aircraft was too high... aim to have the high points around the main center of the aircraft and don't blurr the background out so much.
Ok thanks but I don't understand the bit in Bold

#10 onthescopes

onthescopes

    Airline Transport Pilot

  • Members
  • PipPipPipPipPipPip
  • 2,298 posts
  • Location:Los Angeles

Posted 15 January 2006 - 08:10 PM

Nice tut.

#11 TND4NOS

TND4NOS

    Official Contest Host\Edited Contest Host

  • Contest Host
  • PipPipPipPipPipPipPipPip
  • 10,918 posts
  • Location:Western Australia

Posted 16 January 2006 - 04:16 AM

01hthochr, on Jan 15 2006, 11:12 PM, said:

TND4NOS, on Jan 15 2006, 03:44 PM, said:

Nice, but your opacity around the aircraft was too high... aim to have the high points around the main center of the aircraft and don't blurr the background out so much.
Ok thanks but I don't understand the bit in Bold
High points as in higher opacity... then lower it as you get closer to the edges of the aircraft... i usually start at 60-80% then make my way to 20-25% for the edges.

#12 TomohawK

TomohawK

    Airline Transport Pilot

  • Contest Host
  • PipPipPipPipPipPip
  • 2,682 posts

Posted 16 January 2006 - 12:47 PM

OKAY guys, just a quick note, - there won't be part 2 for a while, having a few PC troubles. Sorry

Tom.

#13 captain-trig

captain-trig

    Private Pilot - VFR

  • Members
  • PipPipPip
  • 154 posts

Posted 17 January 2006 - 12:42 PM

TomohawK, on Jan 16 2006, 05:47 PM, said:

OKAY guys, just a quick note, - there won't be part 2 for a while, having a few PC troubles. Sorry

Tom.
Oh  :D I was looking forward to that!!!!

#14 riddick

riddick

    Student Pilot

  • Members
  • PipPip
  • 86 posts

Posted 10 February 2006 - 03:10 PM

thats a really helpful tutorial, thanks  :D

#15 riddick

riddick

    Student Pilot

  • Members
  • PipPip
  • 86 posts

Posted 11 February 2006 - 06:20 AM

Very good tutorial TomoHawk, i've done this....

NOTE: Its a low resolution, the original one was 400KB so I reedited it with low quality and the it isn't a high quality aircraft, its just an experiment. :D

Posted Image


Cheers!

Edited by riddick, 11 February 2006 - 06:21 AM.


#16 TND4NOS

TND4NOS

    Official Contest Host\Edited Contest Host

  • Contest Host
  • PipPipPipPipPipPipPipPip
  • 10,918 posts
  • Location:Western Australia

Posted 11 February 2006 - 06:47 AM

Nice... Keep working on it, but remember you don't want it too blurry because then the quality gets lower. :D

#17 riddick

riddick

    Student Pilot

  • Members
  • PipPip
  • 86 posts

Posted 11 February 2006 - 07:15 AM

TND4NOS, on Feb 11 2006, 06:47 AM, said:

Nice... Keep working on it, but remember you don't want it too blurry because then the quality gets lower. :D
thanks!  :D

#18 TomohawK

TomohawK

    Airline Transport Pilot

  • Contest Host
  • PipPipPipPipPipPip
  • 2,682 posts

Posted 11 February 2006 - 07:38 AM

Good job Riddick. Keep going and adapt your own style  :D

#19 riddick

riddick

    Student Pilot

  • Members
  • PipPip
  • 86 posts

Posted 14 February 2006 - 02:57 PM

TomohawK, on Feb 11 2006, 07:38 AM, said:

Good job Riddick. Keep going and adapt your own style  :D
thanks tomohawk, but i think its quite bad   :) . Need some practice!  :D

#20 pmdavies33

pmdavies33

    Student Pilot

  • Members
  • PipPip
  • 11 posts

Posted 05 March 2006 - 05:30 PM

Another great Tutorial. For beginners like me this is a godsend. Keep the tips coming!!!