Jump to content


- - - - -

Using The Pen Tool to "Cut Out Objects"


  • Please log in to reply
36 replies to this topic

#1 Captain S.S

Captain S.S

    Private Pilot - VFR

  • Members
  • PipPipPip
  • 321 posts

Posted 31 May 2009 - 07:05 PM

If you are new to Photoshop and/or not familiar with the pen tool then please read my first tutorial, on using the Pen tool, called: Pen Tool Basics.
http://www.flightsim...howtopic=170241

--------------------------------------------------------

Today I'm going to show you how to use the pen tool to cut out an object from a picture.  This is the picture I will be using for this Tutorial:

Posted Image  

In this tutorial I will show you how to separate the CRJ700 from the background in this picture.


First you need to save that picture to your computer and open it up in Photoshop like so:

Posted Image  


Okay next, select the pen tool and zoom in to the image so that you can get a closer look at the edges of the plane.
Zoom in by: Ctrl++
You can zoom in as close as you want but I recommend zooming in by 500%
Make sure you zoom in close enough to get a good look at the edges of the aircraft.

Posted Image


Now, using the pen tool, Start to place anchor points around the edges of the entire Aircraft.

Posted Image


Work Slowly and steadily around the aircraft.  Try to place Anchor points as accurately as possible.
Notice in the picture bellow how I have used less anchor points on straights and more anchor points on
curves.
Also A general rule of thumb is to try and stay at least 1 pixel within the object just to make sure that you don't get any of the background within the path.

Posted Image


Once you are done the whole Aircraft zoom out using: Ctrl+- so that you can see what you have done.  Look to make sure there aren't any mistakes

Posted Image


Should you happen to find a mistake you can move an anchor point by holding Ctrl and then click and drag the anchor point into its new position.

Posted Image


There we go! Its all fixed.  

Posted Image


Should you happen to find an anchor point which you think shouldn't be there all you have to do is right click on that anchor point and then click "Delete Anchor Point" from the pop-up menu.


Posted Image


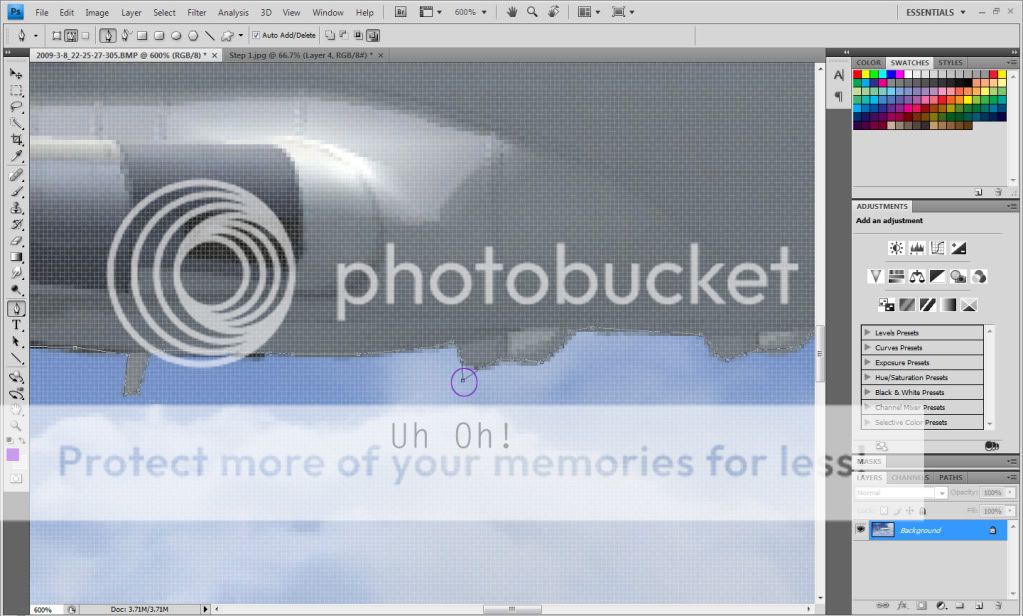
Okay now that you are done and you have fixed all of your mistakes lets make the path you created a selection. BUT first! lets unlock the background layer just to make sure that we don't have any problems.  To unlock the background layer double click on the background layer and then hit OK in the dialog box that comes up.

Posted Image


There! Our background layer is now unlocked and has been renamed to Layer 0 (Or whatever you named it).
Now we can make our path a selection without any problems.  So, right click on any of the anchor points, on the path around the aircraft you have created, and select "Make Selection"

Posted Image


In the dialog box that appears make sure you check anti-aliased (so to reduce jaggies).  You also might want to feather the selection.  Feathering the selection basically blurs the edges so to reduce the look of jaggies.  I would recommend feathering by 0.5 pixels, but that's up to you.  When you are done click OK.  


Posted Image


Our path has now been turned into a selection.  As you can see the anchor points have disappeared and the path has now turned into a moving back and white line.  

Posted Image


Now lets make a copy of our selection (Get the plane off from the background).  Right Click inside the selection area and select "Layer via Copy" from the pop-up menu.  

Posted Image


There we now have, two layers.  The original image is on one layer while the plane is by itself on another layer.

Posted Image


To view the plane by itself just click the eye symbol beside Layer 0 (The layer with the original image on it)  

Posted Image


And there we have it!  The CRJ Is all by itself.  It has been cut out from its background.  Now you can Save this and copy and paste this CRJ to any background image you like.  This ends Tutorial #2.  Have fun!

#2 Chief_Bean

Chief_Bean

    Cruising at FL150

  • Members
  • PipPipPipPipPipPipPipPip
  • 15,351 posts
  • Location:London

Posted 31 May 2009 - 08:42 PM

This isn't the best way to use the pen tool...

#3 Kentaro

Kentaro

    Orville Reincarnate

  • Members
  • PipPipPipPipPipPipPip
  • 7,959 posts
  • Location:Minneapolis/St.paul

Posted 31 May 2009 - 08:57 PM

How about creating a tutorial with the 'real' purpose of the pen tool.

#4 Captain S.S

Captain S.S

    Private Pilot - VFR

  • Members
  • PipPipPip
  • 321 posts

Posted 31 May 2009 - 09:09 PM

Um. Okay I think you both kind of missed the point of this tutorial.

First off, the purpose of this tutorial was to educate people on How to Cut Out Objects.  I didn't make it on the pen tool in general.  

Secondly when it comes to Flight Simulation, cutting out objects is useful for making composites.  (If you don't know what I'm talking about you obviously haven't visited some of the flight simulation screen shot websites such as ScreenShotWorld just to name one)

Thirdly this tutorial was targeted toward "new people"

Anyway that's just what I think.

Edited by Captain S.S, 31 May 2009 - 09:13 PM.


#5 .Sam.

.Sam.

    Commercial Pilot

  • Members
  • PipPipPipPipPip
  • 1,194 posts
  • Location:England,oxfordshire

Posted 01 June 2009 - 04:51 AM

Cheers, gunna help me a lot

#6 Prash

Prash

    Orville Reincarnate

  • Members
  • PipPipPipPipPipPipPip
  • 5,317 posts
  • Location:UK, England

Posted 01 June 2009 - 06:47 AM

I just quicklehh scanned through the tutorial, you used straight lines for everehhhthing?

Meh, just a suggestion, curves will make it better.

#7 Jonay

Jonay

    Airline Transport Pilot

  • Members
  • PipPipPipPipPipPip
  • 2,490 posts
  • Location:Alba

Posted 01 June 2009 - 07:54 AM

You could just use the ploygon selction tool for what you just did

#8 Mr-Sim

Mr-Sim

    Airline Transport Pilot

  • Members
  • PipPipPipPipPipPip
  • 3,914 posts
  • Location:West Midlands

Posted 01 June 2009 - 11:54 AM

Yeah, as Prash said, you used lines, if you want it bet you want to use less curves.

#9 Captain S.S

Captain S.S

    Private Pilot - VFR

  • Members
  • PipPipPip
  • 321 posts

Posted 01 June 2009 - 02:45 PM

I know I could have used curves but personally I don't like using curves and I wouldn't recommend it to Newbies either.  Curves are not accurate enough and are to fiddly for me.  Therefore I prefer using anchor points in "SMALL" increments.  Its less fiddly, more accurate and easier to fix if you make a mistake.  Its all a matter of personal preference, really.
(The Britsh Airways A320 in my sig was "Cut-out" using the method described in the tutorial above.  Look at the result.  Crisp and accurate isn't it?)

Quote

You could just use the ploygon selction tool for what you just did


You cant easily fix mistakes with polygon selection tool as you can with the pen tool, mate. :hrmm:

Edited by Captain S.S, 01 June 2009 - 02:48 PM.


#10 Chief_Bean

Chief_Bean

    Cruising at FL150

  • Members
  • PipPipPipPipPipPipPipPip
  • 15,351 posts
  • Location:London

Posted 01 June 2009 - 02:55 PM

I don't know where you're getting your information from...curves are surely more accurate?

#11 Mr-Sim

Mr-Sim

    Airline Transport Pilot

  • Members
  • PipPipPipPipPipPip
  • 3,914 posts
  • Location:West Midlands

Posted 01 June 2009 - 03:07 PM

Well you must be pretty stupid if you can't handle curves.

#12 Prash

Prash

    Orville Reincarnate

  • Members
  • PipPipPipPipPipPipPip
  • 5,317 posts
  • Location:UK, England

Posted 01 June 2009 - 03:35 PM

View PostCaptain S.S, on Jun 1 2009, 08:45 PM, said:

I know I could have used curves but personally I don't like using curves and I wouldn't recommend it to Newbies either.  Curves are not accurate enough and are to fiddly for me.  Therefore I prefer using anchor points in "SMALL" increments.  Its less fiddly, more accurate and easier to fix if you make a mistake.  Its all a matter of personal preference, really.
(The Britsh Airways A320 in my sig was "Cut-out" using the method described in the tutorial above.  Look at the result.  Crisp and accurate isn't it?)

Quote

You could just use the ploygon selction tool for what you just did


You cant easily fix mistakes with polygon selection tool as you can with the pen tool, mate. :hrmm:

Why?

That's the only way people are going to learn.

And it is accurate if you know how to use it.

#13 -Dexter

-Dexter

    Supersonic

  • Members
  • PipPipPipPipPipPipPipPip
  • 20,183 posts
  • Location:West Virginia, USA

Posted 01 June 2009 - 03:41 PM

View PostLuke S, on Jun 1 2009, 04:07 PM, said:

Well you must be pretty stupid if you can't handle curves.
I know what he's saying though. :hrmm:

Making curves with the pen tool, I know for me, has always been very clunky. In the end, I usually just make little tiny straight lines until I eventually click my way around the curve. :hrmm: Hey, it works! I used the technique with this image: http://i121.photobuc.../2009Camero.png , and while curves would work best, the tiny-straight-lines-with-the-pen-tool-around-the-bend technique seems to work almost as effectively.

Good tutorial. ;)

#14 Chief_Bean

Chief_Bean

    Cruising at FL150

  • Members
  • PipPipPipPipPipPipPipPip
  • 15,351 posts
  • Location:London

Posted 01 June 2009 - 03:47 PM

View Postpwn247, on Jun 1 2009, 09:41 PM, said:

View PostLuke S, on Jun 1 2009, 04:07 PM, said:

Well you must be pretty stupid if you can't handle curves.
I know what he's saying though. :hrmm:

Making curves with the pen tool, I know for me, has always been very clunky. In the end, I usually just make little tiny straight lines until I eventually click my way around the curve. :hrmm: Hey, it works! I used the technique with this image: http://i121.photobuc.../2009Camero.png , and while curves would work best, the tiny-straight-lines-with-the-pen-tool-around-the-bend technique seems to work almost as effectively.

Good tutorial. :o
Not really, the tyres on the car look blocky ;)

Curves are the way to go lol.

Edited by Chief_Bean, 01 June 2009 - 03:47 PM.


#15 Captain S.S

Captain S.S

    Private Pilot - VFR

  • Members
  • PipPipPip
  • 321 posts

Posted 01 June 2009 - 04:32 PM

Again people its a matter of personal opinion.  You can use curves if you like, but I prefer using little tiny straight lines.  Its funny actually, before I came here most people I knew used to like the method I am using but here its the exact opposite.  Either way though you get the same result if you do it properly. (Again look at my sig, the plane in particular).  

Quote

Well you must be pretty stupid if you can't handle curves.


Read Please. I didn't say I couldn't use curves I just said I found it too bulky and Not as easy the point to point method.  

Quote

the tiny-straight-lines-with-the-pen-tool-around-the-bend technique seems to work almost as effectively.


Exactly

Quote

I don't know where you're getting your information from...curves are surely more accurate?


I've been photo shopping for a couple of years now and took a course in high school on this. Again this tutorial is for "Newbies".  And guess which method they decided to teach us first (And recommended us to use) back when I took that high school course? Not Curves.


Also a question I'd like to ask:  How many of you have actually tried the point-to-point method on a regular basis, hmmm?  Don't draw any conclusions unless you actually tried and use both methods please.

#16 Prash

Prash

    Orville Reincarnate

  • Members
  • PipPipPipPipPipPipPip
  • 5,317 posts
  • Location:UK, England

Posted 02 June 2009 - 12:38 PM

TBH with you mate, I first learnt with point to point, and now I wish I had learnt with curves.

So much easier.

Meh, I respect anyone who tried to do a tutorial to help anyone, but just throwing it out there :hrmm:

#17 Captain S.S

Captain S.S

    Private Pilot - VFR

  • Members
  • PipPipPip
  • 321 posts

Posted 03 June 2009 - 02:36 PM

Again its a matter of personal preference.  I like using the point-to-point method therefore that's the method I taught in this tutorial.  If you like curves better that's fine. They are both correct, accurate, and you still get the same result in the end which is all that matters really.

#18 Speedbird_one

Speedbird_one

    formerly 01hthochr

  • Members
  • PipPipPipPipPipPip
  • 3,567 posts
  • Location:Near Sheffield

Posted 03 June 2009 - 06:02 PM

Basically you are doing an accurate 'point by point' (if such a thing exists..) Then feathering it to take away the detail, Really makes no sence to me.

#19 tropicalfish

tropicalfish

    Orville Reincarnate

  • Members
  • PipPipPipPipPipPipPip
  • 9,935 posts
  • Location:N. Texas, US

Posted 03 June 2009 - 06:15 PM

Using curves saves me half a million clicks when going around curved or round objects.

#20 SwitchFX

SwitchFX

    formerly TeleFarsi_Airlines818

  • Members
  • PipPipPipPipPipPipPipPip
  • 30,764 posts

Posted 04 June 2009 - 01:38 AM

Ok, I've been a member of this site for nearly 6 years now? And at this time I've been super nice or at least try to be super nice. However, this post just takes the cake.


Get ready to be schooled.

View PostCaptain S.S, on Jun 1 2009, 12:45 PM, said:

Curves are not accurate enough and are to fiddly for me.

WRONG! You could not be any more wrong. The pen tool and its properties is based on the Bezier algorithm. That's why vector images are math and not just image data. Go look up the differences between vector and raster.

Second of all, if curves aren't accurate - Then I highly suggest you to go running into any car company HQ and tell their designers to stop! Because apparently the pen tool isn't accurate, yet it's used to develop car designs amongst several other things in the world!

Third of all, they, my silly little teenager buddy, curves are not fiddly. Why? They're not, you can get a closer gap between things. And if you mess up? Well, just add a point and work the kinks out. Which takes less than 30 seconds at most for anyone.

View PostCaptain S.S, on Jun 1 2009, 02:32 PM, said:

Again people its a matter of personal opinion.  You can use curves if you like, but I prefer using little tiny straight lines.  Its funny actually, before I came here most people I knew used to like the method I am using but here its the exact opposite.  Either way though you get the same result if you do it properly. (Again look at my sig, the plane in particular).  


I've been photo shopping for a couple of years now and took a course in high school on this. Again this tutorial is for "Newbies".  And guess which method they decided to teach us first (And recommended us to use) back when I took that high school course? Not Curves.


Also a question I'd like to ask:  How many of you have actually tried the point-to-point method on a regular basis, hmmm?  Don't draw any conclusions unless you actually tried and use both methods please.

1. You prefer it that way because you learned how to use the pen tool in this manner. Which isn't how you're supposed to use the pen tool, but whatever floats your extra tiny boat. :hrmm: Most people like it this way because they're lazy to learn the real way and :hrmm: about it when they can do it right, or rather they don't want to follow steps.


2. For a couple of years, hmm? And you took a course in high school. Well done. A newbie can pick up on how to use the pen tool in 20 minutes time tops, learn something the wrong way and it'll be with you and it will become harder to change your ways.

You've been using Photoshop for 2-3 years? I've been using it since 5.0, you were still playing with toys back then! ;)  Whoever your teacher was is an idiot. Shame on him or her for even teaching students to learn this cheap method.  


3. I have, no really I have. It came out choppy. The pen tool was integrated into Photoshop to create vectors and extract images with clean cut lines. A good job doesn't require you to feather the edges. A plane doesn't travel in the sky with a fuzzy halo around it.

Edited by SwitchFX, 04 June 2009 - 01:44 AM.